

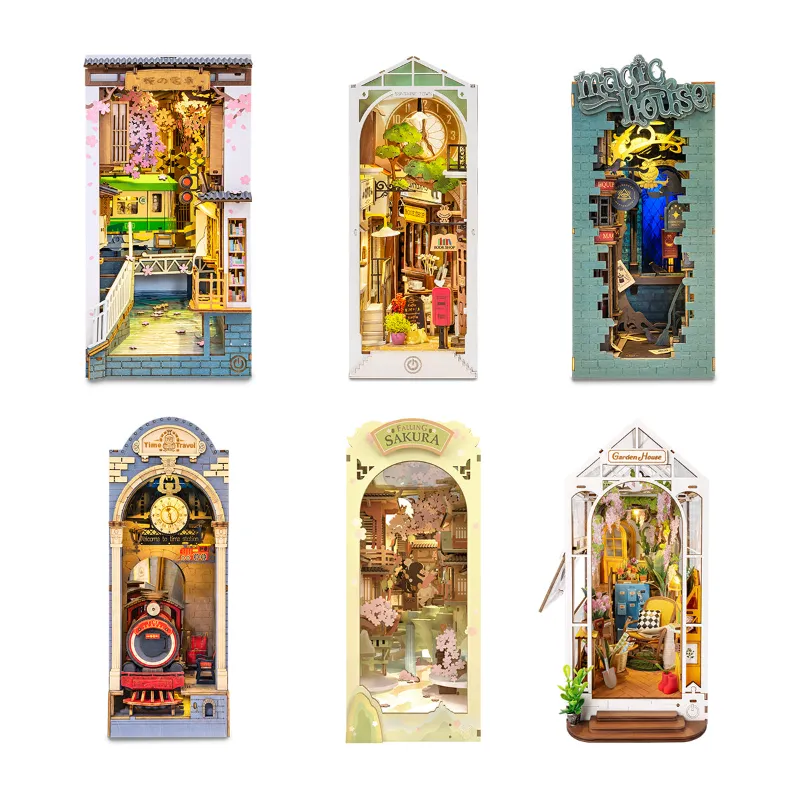
You can assemble a rolife book nook kit in a single weekend by building the small insert scenes first, wiring and testing the lights before the walls go up, and gluing parts only after you have dry-fitted them. These kits are sold as beginner-friendly builds, and most people finish in two or three sittings. The problems that stop people are predictable: glue where it should not be, wires pinched under a floor panel, and paper edges lifting at the corners.
Below is the walkthrough we use whenever we test a new rolife book nook: what is in the box, the tools worth adding, the assembly order, and the fixes for the three mistakes that catch almost every first-time builder.
What Is Inside a Rolife Book Nook Kit
Every kit in the Rolife book nooks range follows the same logic. You get flat wooden sheets with laser-cut parts, printed paper sheets for floors, walls and tiny props, a light string or LED module, and small hardware.
- Pre-cut wooden boards, usually plywood, often with a few spare parts
- Printed paper and card sheets for wallpaper, book spines, signage and packaging
- LED lighting with a switch and battery holder
- Basic tools: glue, tweezers, sandpaper and a small scraper in most kits
- A photo-led instruction booklet with numbered stages
Check the box for the battery type before you open anything. Running out of batteries halfway through the wiring stage is the most common reason a build sits on the shelf for a week.
If this is your first Rolife kit, the book nook line is the friendliest entry point. The mini house kit range uses the same wood, paper and lighting approach and scales up into room-sized builds once you have one finish behind you.
Tools and Materials Worth Adding
The included tools work, but a few cheap upgrades make assembly faster and cleaner. This is the assembly tools and materials list we keep on the bench.
- Craft knife with a fresh blade for trimming paper and flash
- Small self-healing cutting mat
- Fine-tip glue applicator or a toothpick for precise dots of glue
- Low-tack masking tape to hold parts while glue sets
- Fine-tip tweezers for routing wire and placing tiny props
- A desk lamp or head torch, because you will be working inside a dark nook
Do not swap superglue for the wood glue on printed or painted parts. It grabs too fast, dries shiny, and can fog clear plastic. Water-based craft glue is the safer choice anywhere paper meets wood.
Step-by-Step Assembly Order
- Sort and label the sheets. Punch nothing out yet. Lay the boards out in the order the manual lists and check parts against the diagrams.
- Dry-fit the outer frame. Assemble the shell without glue to confirm the floor, sides and back sit square. Sand tight tabs rather than forcing them.
- Build the small props first. Books, crates, lamps and shelf units are far easier to place before the walls close in around them.
- Test the lights before installing them. Connect the LED string to the battery holder, switch it on, and confirm every light works. Then route the wire along the channels or corners the manual marks.
- Glue the insert scenes. Work from the back of the nook forward. Use dots of glue, press for a few seconds, tape anything that wants to slide.
- Close the shell last. Fit the front frame and side panels, check no wire is pinched, and glue only once everything lines up.
- Touch up and let it cure. Sand edge marks, re-press lifted paper with a thin smear of glue, and leave the whole build overnight before a long lighting test.
The same sequence works on a flower house miniature house or a wooden doll house, so once you have learned it you can apply it to almost any wooden model kit in the range.
How Difficult Is It, Really?
Book nooks sit at the easy end of the wooden model kits shelf. Here is a rough comparison of the Robotime builds we get asked about most.
| Kit type | Difficulty | Best for |
|---|---|---|
| Book nook kit | Beginner to intermediate | First-time builders, detail lovers |
| Wooden doll house | Beginner | Family builds and kids with help |
| Cuckoo clock kit | Intermediate | Anyone who enjoys moving parts |
| Pinball machine kit | Advanced | Confident makers with a few builds done |
If you have never built anything, start with a book nook. If you have one or two builds behind you, the cuckoo clock and pinball machine are the natural next step, because both add mechanisms and gear alignment on top of the usual paper and wood work.
Three Common Mistakes and How to Fix Them
- Glue squeeze-out on printed paper. Use dots, not lines, and keep a dry cotton bud nearby to lift excess before it sets. Once paper is soaked, the stain stays.
- Pinched or reversed wires. Route the wire and test the lights at every stage, not just at the end. If a section goes dark, check the connector before you pull anything apart.
- Warped floors and bowed walls. This is almost always too much glue in one spot. Clamp or tape the part flat and let it dry fully before adding weight on top.
One more that is not on the list but shows up often: building on a soft surface. Work on a hard table. Small parts vanish into carpet and tiny tabs snap when a sofa cushion takes the pressure.
Finishing, Lighting and Care
- Dust the nook with a soft brush or camera blower rather than a cloth, which can catch on paper props.
- Keep it out of direct sun, since printed paper fades faster than the painted wood.
- Fit a switch you can reach without lifting the kit off the shelf.
- Remove batteries for long storage, and store the spare parts bag with the manual.
Who It Suits, and Where to Buy
Book nooks work for adults who want a calm, screen-free project, for teenagers who already like paper craft, and for anyone who has run out of shelf space for larger builds. They also make genuinely good unique presents for the hobbyist who has everything, especially paired with a small add-on like a nanci blind box for the person who likes surprise over instruction manuals.
Prices and promos move around, so rather than quote a number here, check the latest price and grab the code before you order. Shipping and returns are handled by the store, and if you are buying for a birthday, order with enough lead time to build it yourself first so you can hand over a finished piece. Our coupon page carries the current Robotime offer, which applies across the range including the book nook kits.
Start with one kit, keep the manual, and you will find the second build takes about half the time.
 Shopping at Robotime? See today's verified Robotime discount code
Frequently asked questions
How long does it take to build a rolife book nook kit?
Plan on a weekend. Most builders spread it across two or three sessions of a few hours each, with an overnight cure before the final lighting test. Small props and paper work take the most time, not the wooden frame.
Do I need extra tools to assemble a Rolife book nook?
The kits include glue, tweezers and sandpaper in most cases, so you can start straight away. A craft knife, cutting mat, fine-tip glue applicator and a small desk lamp make the build noticeably cleaner.
Can children help build a book nook kit?
Older kids and teenagers can handle the prop assembly and paper work with supervision, since the parts are small and the craft knife is the main risk. Check the age guidance printed on the box for the specific kit before you buy.
What batteries does the lighting need?
It varies by kit, so check the battery holder inside the box or the first page of the manual before you start. Buying the right batteries up front means you can test the lights as you go instead of at the very end.
Can I paint or stain the wooden parts?
Yes, and it is easiest before assembly. Use thin coats of water-based acrylic so the laser-cut tabs still fit, and avoid heavy paint on joints that need to slot together.
Is the mini house kit or the book nook easier for a first build?
The book nook is usually the simpler starting point because the scene is contained and the lighting run is short. A miniature house kit like the flower house adds more rooms and furniture, so it suits a second or third build.