
Best AirTag Bicycle Mounts That Stay Secure on Rough Terrain

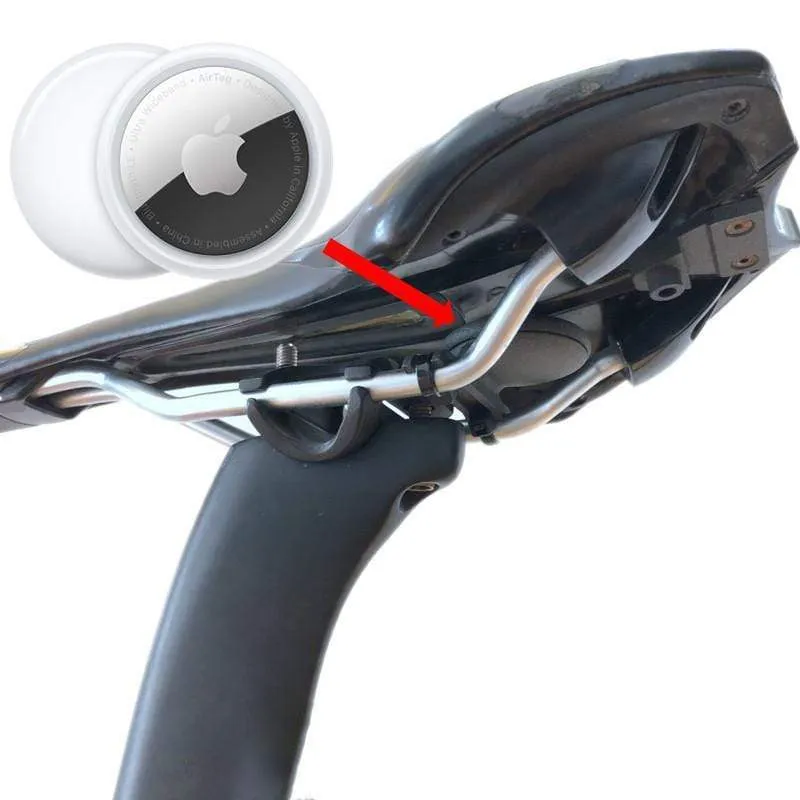
A bicycle mount airtag must grip tight enough to survive gravel paths, potholes, and daily commutes without rattling loose or exposing your tracker to thieves. We tested mounts across different attachment styles to find which designs stay secure when terrain gets rough and which placements keep your AirTag hidden yet functional.
Why Standard Mounts Fail on Bicycles
Most generic AirTag holders are designed for keychains or bags, not the constant vibration and impact of cycling. The three failure points we see most often are loose threading that works itself open over miles of rough road, adhesive that peels away from sweat and dirt buildup, and exposed designs that advertise the tracker's location to anyone looking. A proper bike mount needs mechanical retention (not just glue), weather resistance, and a low profile that blends into your frame or components.
Cyclists in forums like this bike community discussion report mounts falling off during single-track rides or being spotted and removed within days of city parking. The solution is choosing mounts engineered specifically for cycling stress and placing them where they're both secure and hidden.
Top Bicycle Mount AirTag Styles We Recommend
We've found three mount categories that actually hold up to real-world riding. Each suits different bike types and theft-risk scenarios.
Bottle cage mounts install behind your water bottle, using the same bolt holes. The AirTag sits sandwiched between the cage and frame, invisible unless someone removes your bottle cage entirely. These work best on road and gravel bikes where a bottle cage is standard equipment. Look for mounts with bolt-through retention rather than friction clips.
Reflector mounts replace your rear reflector (which most riders remove anyway) and house the AirTag inside a functional reflector body. You maintain visibility for night riding while hiding the tracker in plain sight. The TinyTag Bicycle Mount style has earned positive feedback for this approach. These suit commuters and city riders who park in high-risk areas.
Saddle rail mounts clamp onto the metal rails under your saddle. They're nearly invisible from any normal viewing angle and require a thief to flip your bike or crouch down to spot them. The constant flexing of saddle rails means you need a mount with rubberized contact points that won't crack or slip. We recommend designs that wrap around the rail rather than side-clip models.
| Mount Style | Best For | Visibility | Installation |
|---|---|---|---|
| Bottle cage | Road, gravel, touring | Hidden behind bottle | 2 bolts, 5 minutes |
| Reflector housing | Commuters, city parking | Disguised as safety gear | Seat post bolt, 3 minutes |
| Saddle rail clamp | All bike types | Nearly invisible | Tool-free clamp, 2 minutes |
For the most secure setup, check current pricing and grab our code before you buy. Techypop currently offers 10% off sitewide, which applies to protective gear that pairs well with your bike security setup.
Materials That Survive Weather and Vibration
The best mounts use either reinforced nylon composite or aluminum alloy. Nylon flexes slightly to absorb shock without cracking, and it won't corrode from rain or sweat. Quality nylon mounts add fiberglass or carbon fiber reinforcement at stress points. Aluminum offers superior strength and a slimmer profile but costs more and can eventually fatigue at bend points if the design has sharp angles.
Avoid pure silicone or soft TPU mounts for bikes. While these materials cushion drops well for keychains, they don't provide enough structural rigidity to prevent the AirTag from shifting inside during sustained vibration. One exception: silicone or rubber contact pads inside a rigid shell help dampen noise and protect your AirTag's battery from constant shock.
Stainless steel hardware matters more than most riders expect. Cheap zinc bolts and screws will seize or rust within months of wet riding. If your mount uses screws, replace them with stainless steel if the originals look suspect, or apply a tiny amount of anti-seize compound to threads before installation.
Installation Tips for Maximum Security
Clean the contact surface with isopropyl alcohol before mounting. Even new bikes have a film of assembly grease or shipping wax that prevents adhesive or rubber from gripping properly. Let the area dry completely before installing.
Torque bolts correctly if your mount uses your bottle cage or fender bolt holes. Under-tightening allows the mount to rotate and work loose. Over-tightening can crack composite mounts or strip aluminum threads in your frame. Most bottle cage bolts need 4 to 5 Nm of torque. If you don't own a torque wrench, snug the bolt firmly by hand with a hex key, then add a quarter turn.
Test before you ride. Install the mount without the AirTag first, then take a 10 minute shakedown ride on rough pavement or gravel. Check whether the mount has shifted or loosened. Only after this test should you install your AirTag and seal the mount. This two-step approach has saved us multiple AirTags from being lost on the first real ride.
One reader on the Electric Bike Review forum noted that mounting on the rear triangle (seat stays or chain stays) reduces vibration compared to fork or handlebar placement. The rear triangle flexes less and sees less direct impact from the front wheel hitting obstacles.
How to Keep Your Bicycle Mount AirTag Hidden
Thieves know to look for AirTags now, so placement strategy matters as much as mount quality. Avoid anywhere a thief would naturally grab or inspect during a quick theft. That rules out handlebars, top tube, and the obvious underside of your saddle nose.
The best spots are behind components that require tools to remove: behind your bottle cage, inside the seat post (if you have a mount that slides into the tube opening), or under chainstay protector wraps. Some riders drill into handlebar ends or steerer tube caps to hide an AirTag inside the cockpit, but that's permanent modification and voids some warranties.
Multiple trackers work better than one obvious mount. Use a visible decoy mount in an easy-to-spot location and a second hidden mount in a tool-required spot. Thieves find the decoy, remove it, and assume they're safe. We've heard of this strategy recovering bikes even after the thief thought they'd defeated tracking. Of course, that means buying a second AirTag, but it costs far less than replacing a stolen bike.
For additional protection of your other gear, the same store that offers bike accessories also carries protective cases for your tech. If you're looking to safeguard your phone during rides, check their protective case options that range from rugged styles to unique designs. Just as you're protecting your bike investment, protecting your phone from drops and weather makes sense for cyclists who rely on navigation and fitness apps.
Who Should Use Which Mount Style
Road cyclists and racers prioritize weight and aerodynamics, so bottle cage mounts make the most sense. They add minimal weight (8 to 15 grams) and create no additional drag. Avoid anything that protrudes from the frame profile.
Mountain bikers and gravel riders need mounts that handle serious impacts and mud buildup. Saddle rail mounts and sealed reflector designs work best because they're either tucked away from trail debris or fully enclosed. Check that any mount has drainage holes so water and mud can escape rather than pooling around your AirTag.
Commuters and city riders face the highest theft risk, so dual-mount setups (one visible, one hidden) give the best recovery odds. Reflector mounts serve double duty by maintaining your legal lighting requirements in most regions while hiding your tracker.
Touring and bikepacking cyclists should choose mounts that don't interfere with bag attachment points. Saddle rail mounts can conflict with saddle bags, and bottle cage mounts obviously occupy your water bottle bolts. Consider steerer tube caps or mounts that attach to rear rack eyelets if you're carrying full bags.
Before you commit to a mount style, visit the discount page to see current offers on protective accessories that complement your bike security setup. The 10% sitewide discount applies to gear that helps you protect both your bike and the devices you carry while riding.
Maintenance and Seasonal Checks
Even the best mounts require occasional inspection. We recommend checking your mount every 2 to 4 weeks during regular riding, and before any long ride or trip. Look for cracks in the housing, loosening of bolts or clamps, and dirt buildup that could trap moisture against your AirTag.
Remove your AirTag twice a year to inspect the mount interior and test the AirTag's battery. Constant vibration can drain batteries slightly faster than stationary use. Clean the mount with a damp cloth and let it dry fully before reinstalling the tracker. This is also a good time to verify your AirTag still pings correctly in Find My and hasn't developed any connection issues.
If you ride in winter with road salt or live in a coastal area with salt spray, rinse your mount with fresh water every few weeks. Salt crystallizes in small gaps and can corrode metal components or make plastic brittle over time. A quick spray with a hose takes 30 seconds and extends mount life significantly.
Frequently asked questions
Will a bicycle mount airtag survive mountain biking?
Yes, if you choose a mount designed for high-impact use with reinforced nylon or aluminum construction and secure it to a low-vibration point like the rear triangle. Avoid adhesive-only mounts and opt for bolt-through or clamp designs that won't shake loose on rough trails.
Where should I hide an AirTag on my bike so thieves won't find it?
The best hiding spots require tools to access: behind your bottle cage, inside the seat post tube, or under a chainstay protector. Consider using two AirTags with one visible decoy and one truly hidden tracker.
Can I use the same mount for AirTag 1st and 2nd generation?
Most bicycle mounts fit both generations since Apple kept the same physical dimensions. Check the product specs to confirm compatibility, especially for tight-fit designs that rely on precise measurements.
How often should I check my bike mount for loosening?
Inspect bolt-mounted designs every 2 to 4 weeks and before long rides. Check clamp-style mounts weekly for the first month, then monthly once you've confirmed they stay tight on your specific bike and riding style.
Do reflector AirTag mounts actually work for visibility?
Quality reflector mounts provide functional rear visibility while hiding your tracker. Look for designs with real reflective surface area, not just a clear window, to maintain safety during night riding.
Will weather damage my AirTag in a bike mount?
AirTags are splash and dust resistant (IP67), but prolonged exposure to heavy rain can eventually cause issues. Choose mounts with weather seals or gaskets, and ensure they have drainage holes to prevent water pooling inside the housing.