
How to Set Up a DIY Cold Plunge at Home With a Water Chiller

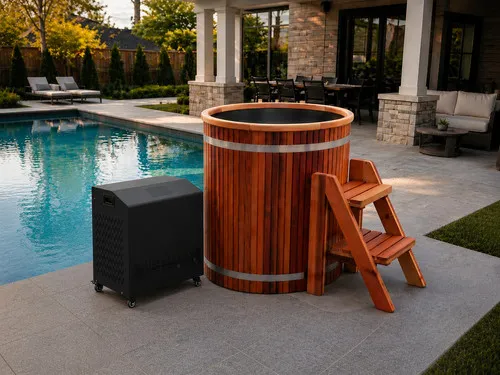
A cold plunge chiller lets you transform any tub into a consistent cold therapy station by maintaining water temperature without endless ice runs. We've tested several DIY setups and found that pairing the right chiller with the right vessel makes installation straightforward, even if you've never plumbed anything before.
Why a Cold Plunge Chiller Beats Buying Ice
Most people start their cold plunge journey filling a stock tank with bag ice every other day. That gets expensive and inconvenient fast. A chiller circulates and cools your water continuously, holding it at your target temperature around the clock. You set it once, and the system does the rest.
The 1hp water chiller is the sweet spot for home setups. It handles tubs up to 120 gallons, cools water down to 37°F, and runs on a standard 110V outlet. Pair it with filtration and ozone sanitation, and you'll only need to change the water every few weeks instead of daily top-ups.
Choosing Your Tub: Cedar, Acrylic, or Stock Tank
Your tub choice shapes the entire build. We recommend three paths depending on budget and aesthetic preference.
Cedar offers natural insulation and a spa-like look. The cedar cold plunge arrives pre-drilled for plumbing and seats one or two people comfortably. Cedar requires occasional oiling to prevent cracking, but the thermal performance is excellent.
Acrylic is lighter, easier to move, and holds temperature nearly as well as cedar. The acrylic cold plunge tub weighs about half what cedar does and works indoors or out. It's also simpler to clean and won't splinter.
Stock tanks are the budget route. A 100-gallon Rubbermaid or galvanized tank runs under $150 at farm supply stores. You'll drill your own inlet and outlet ports, but the process is manageable with a hole saw and bulkhead fittings.
| Tub Type | Capacity | Insulation | Setup Difficulty |
|---|---|---|---|
| Cedar | 80–120 gal | Excellent | Low (pre-drilled) |
| Acrylic | 60–100 gal | Very good | Low (pre-drilled) |
| Stock tank | 50–150 gal | Moderate | Medium (DIY ports) |
What's Included in a Cold Plunge Chiller Kit
A complete chiller kit bundles the cooling unit, pump, filter, hoses, and fittings in one package. The 1.0hp diy cold plunge bundle includes everything except the tub itself, and all the components are sized to work together. You avoid the trial-and-error of matching flow rates and thread sizes.
Most kits ship with:
- 1HP compressor chiller rated for continuous duty
- Circulation pump (typically 1/10 HP, 20–30 GPM)
- Cartridge or sand filter to catch debris
- Ozone generator to reduce bacteria without harsh chlorine
- Hoses, clamps, and unions for plug-and-play assembly
If you already own a tub and just need the cooling hardware, a standalone cold plunge chiller will do the job. You'll source your own pump and filter, which gives you flexibility but requires a bit more research.
Step-by-Step Installation for a DIY Cold Plunge Chiller
We'll walk through the install using a bundle and a stock tank. If you bought a pre-drilled cedar or acrylic tub, skip straight to connecting the hoses.
1. Drill Inlet and Outlet Ports
Mark two spots on your tub sidewall about six inches below the waterline and six inches apart. Use a 2-inch hole saw to cut clean openings. Slide bulkhead fittings through from the outside, tighten the locknut on the inside, and seal with plumber's putty or silicone. Let it cure for an hour.
2. Position the Chiller and Pump
Set your chiller on a level surface within five feet of the tub. The pump should sit below the waterline for priming. Some builders mount the pump on a small platform or hang it on the tub wall with brackets.
3. Connect the Plumbing Loop
Attach one hose from the tub outlet to the pump inlet. Run a second hose from the pump outlet to the filter inlet. Connect the filter outlet to the chiller inlet, then the chiller outlet back to the tub inlet. Use hose clamps at every connection and check for kinks.
4. Fill, Prime, and Power On
Fill the tub to about two inches above the outlet port. Open the pump's priming plug if it has one, then switch on the pump until water flows steadily. Close the plug, plug in the chiller, and set your target temperature on the digital controller. Most units take 12 to 24 hours to pull a full tub down to 40°F on the first cycle.
Grab our discount code to save 5% on your entire order, including bundles and standalone chillers.
Best Cold Plunge Chiller Options in Canada
If you're shopping in Canada, availability and voltage matter. The water chiller canada model ships from a Canadian warehouse, cutting lead time and import fees. It runs on 110V standard household power, so you won't need an electrician to install a 220V circuit.
Reddit threads often recommend this unit because it's built by Pro Chiller, a manufacturer that supplies commercial aquaculture and lab systems. The residential cold plunge models use the same compressor tech, just in a smaller footprint.
For smaller spaces or single-user setups, the cold plunge ice barrel 1hp chiller pairs a vertical barrel tub with a compact 1HP unit. The barrel footprint is about two feet in diameter, so it fits on apartment balconies or in corner nooks where a full tub won't.
Maintenance: Filter, Ozone, and Water Changes
A cold plunge chiller and filter system keeps water clean far longer than an un-filtered tub, but you still need a light maintenance routine.
- Rinse or replace the filter cartridge every two weeks. If you're using the tub daily, check it weekly.
- Run the ozone generator for 15–30 minutes after each session. Ozone oxidizes oils and bacteria, reducing the need for chlorine or bromine.
- Check pH and sanitizer once a week with test strips. Aim for pH 7.2–7.6 and a small chlorine residual (0.5–1.0 ppm).
- Drain and refill every 4–6 weeks, depending on use. A hose and sump pump make this a 20-minute job.
Chillers themselves are low-maintenance. Keep the condenser fins clear of dust and leaves, and the compressor will run for years without service.
Who Should Build a DIY Setup vs. Buy a Turnkey Plunge
Building your own cold plunge chiller system makes sense if you want to customize capacity, save on markup, or already own a suitable tub. The 1.0hp diy cold plunge bundle typically costs 30–40% less than a branded all-in-one unit with comparable specs, and you can scale the tub size to fit your space.
A turnkey system is faster if you value plug-and-play convenience and don't want to drill or plumb anything. But turnkey units often lock you into proprietary filters and smaller tub volumes.
We lean toward DIY for anyone comfortable with basic hand tools. The install takes a weekend, and you'll understand every component if something ever needs troubleshooting. Check the latest pricing and bundles to compare your options before you commit.
Cold therapy works best when it's consistent, and a properly installed cold plunge chiller delivers that without the daily ice haul. Pick your tub, connect the loop, and you'll have cold water on demand every morning.
Frequently asked questions
What size cold plunge chiller do I need for a 100-gallon tub?
A 1HP chiller handles tubs up to 120 gallons and will cool 100 gallons to 40°F in 12 to 24 hours. Smaller 1/2 HP units work for tubs under 60 gallons but take longer to reach target temperature.
Can I use a stock tank with a cold plunge chiller kit?
Yes. You'll need to drill two ports in the sidewall for inlet and outlet fittings, then connect the hoses from the chiller bundle. Use bulkhead fittings and silicone sealant to prevent leaks.
How often do I need to change the water in a chilled cold plunge?
With a filter and ozone system, you can go 4 to 6 weeks between full water changes. Rinse the filter every two weeks and monitor pH weekly to keep water fresh.
Does a 1HP water chiller require 220V power?
Most residential 1HP cold plunge chillers run on standard 110V household power. Check the spec sheet before you buy, but the majority plug into a regular outlet without rewiring.
Is a DIY cold plunge chiller setup hard to install?
Installation takes a few hours if your tub is pre-drilled, or a weekend if you're drilling ports yourself. The plumbing is straightforward: connect hoses between pump, filter, chiller, and tub, then power on.
What is the difference between a cold plunge chiller and filter combo?
A chiller cools the water using a refrigeration compressor, while a filter removes debris and oils. Many kits bundle both so you get clean, cold water without buying components separately.