

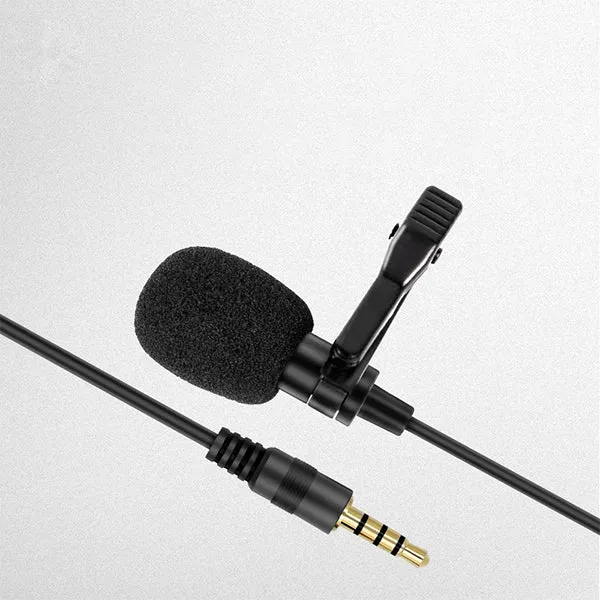
A microphone 3.5mm plug is the standard hands-free input on most aftermarket head units, and wiring it correctly comes down to three things: the plug seats in the right jack, the cable reaches your headliner, and the mic element sits where your voice is loudest. Do that and calls sound clean even at highway speed.
We test these installs on real cars, and the pattern is always the same. The mic itself is rarely the problem. The routing, the plug depth, and the trim clips are what people get wrong. Here is the full process, plus notes for the specific vehicles and parts we stock.
What a microphone 3.5mm input actually does
On an aftermarket radio, the 3.5mm mic jack is a low-voltage mono input. The stereo supplies a small bias voltage to the electret capsule inside the mic, which is why a bare 3.5mm mic from a phone kit often works while a passive aux cable does not.
- Plug type: 3.5mm TRS or TRRS, four-pole mics can misbehave in three-pole jacks.
- Bias voltage: supplied by the head unit, usually 3 to 5 volts.
- Signal: mono, so a stereo cable gains you nothing but hum.
- Length: most kits ship with 3 to 5 metres, enough to run from the radio to the A-pillar and along the headliner.
If your new stereo has a rear-mounted 3.5mm pigtail rather than a jack on the faceplate, that is normal. The pigtail is meant to be fed into the dash cavity and routed up the passenger side.
Step-by-step: wiring the mic to a new head unit
- Disconnect the battery negative. Non-negotiable before you touch the radio harness.
- Pull the head unit and identify the mic input. Look for a 3.5mm socket on the rear chassis or a labelled pigtail, often marked MIC.
- Test-fit the plug before you route anything. Plug the microphone 3.5mm in, power the radio on a bench supply or with the battery reconnected briefly, and confirm the unit detects it.
- Route up the passenger A-pillar. Tuck the cable behind the door weatherstrip, then behind the pillar trim. Avoid the driver side, where the pedal box crowds the run.
- Feed along the headliner edge. Use a plastic trim tool, not a screwdriver, and keep the cable clear of side-curtain airbags.
- Mount the capsule at the top of the A-pillar or on the mirror stem. Roughly 20 to 30 cm from your mouth, aimed at your face, with no trim blocking it.
- Test a real call at speed. Call a friend from a car park, then again at 100 km/h. If you sound distant, move the capsule forward, not up.
The most common failure is pushing a four-pole plug into a three-pole jack. The mic works for a second, then the radio drops it. If that happens, swap to a three-pole mic or a short TRRS-to-TRS adapter.
Matching the mic to the stereo you installed
Different builds need different approaches. Here is how the four installs we see most often handle it.
| Install | Mic input location | What to watch |
|---|---|---|
| 2019 ford explorer sport head unit upgrade | Rear of unit, pigtail | Sync 3 retrofit units often need the factory mic adapter harness |
| 2015 chevy silverado radio | Rear 3.5mm jack | Keep the cable away from the amp turn-on lead to avoid alternator whine |
| Generic double-DIN with CarPlay | Front or rear 3.5mm | Test the jack depth before final trim fit |
On the Explorer, the factory overhead console mic does not talk to most aftermarket units without an adapter, so plan on running a separate capsule even if you keep the original housing. On the Silverado, the dash is deep and the run is easy, but the footwell gets wet in winter, so secure the cable above the kick panel rather than draping it across.
If you are adding wireless CarPlay at the same time, the wired to wireless carplay adapter plugs into the USB port and leaves the mic circuit untouched. That is a good thing: fewer variables during one install. Our wired to wireless carplay adapter guide style of setup is to finish the audio and mic first, confirm calls work, then add the adapter and re-test.
For cars where the stereo sits low and out of sight, a tesla model 3 hud display or similar head-up unit changes nothing about the mic wiring, but it does change where you mount a control pad, so plan both at once.
Compatibility checks before you buy
Not every 3.5mm mic plays nicely with every radio. Run these checks first.
- Pole count: confirm your head unit wants TRS (three-pole) or TRRS (four-pole). The manual will say, or the jack will look like it has two or three rings.
- Bias voltage: if the radio does not supply bias, you need a powered mic.
- Cable gauge: thin cables are easier to route but pick up noise near power runs.
- Shielding: look for a shielded cable and a capsule with a foam windscreen.
- Connector shape: a straight plug fits a rear jack better than a right-angle one in tight cavities.
If your factory mic is already in the overhead console and you want to reuse it, check whether the car uses a two-wire or three-wire capsule. Three-wire capsules rarely work with aftermarket inputs.
Setup, care, and getting the most from the mic
After the install, spend five minutes on tuning.
- Run the radio's mic gain or echo-cancel setting, if it has one, in a quiet garage.
- Ask the person on the other end which setting sounded best at 80 km/h.
- Keep the capsule out of direct airflow from the vents and away from the sunroof drain.
- Clean the foam windscreen every few months; dust and pollen make you sound muffled.
- Re-check the plug after a few weeks. Vibration works loose anything that was only hand-tight.
Buying the parts with our code
The microphone 3.5mm we stock is a plug-and-play replacement for most aftermarket radios, and it is the part we reach for first on these installs. If you are also doing the head unit, the 2019 ford explorer sport head unit upgrade and 2015 chevy silverado radio listings include the harness details you need to match the mic input.
Before you check out, grab the code for 10% off sitewide, and read the zhnncar review and reliability notes plus the zhnncar return and warranty policy if you are unsure which version fits. Shipping and delivery info is on the same page. If you only take one thing from this guide, take this: test the mic before you refit a single trim panel.
 Shopping at ZHNNCAR? See today's verified ZHNNCAR discount code
Frequently asked questions
Will any microphone 3.5mm plug work with my aftermarket stereo?
Mostly, but check the pole count. A three-pole TRS mic is the safe default; four-pole TRRS mics can drop out on radios that only expect three poles. The radio's manual will name the jack type.
Can I reuse my factory overhead microphone with a new head unit?
Sometimes. Two-wire factory capsules often work with an adapter harness, but three-wire capsules usually will not. On a 2019 Ford Explorer head unit upgrade we usually run a separate capsule rather than fight the factory wiring.
Where should I mount the mic capsule for the best call quality?
Top of the passenger A-pillar or the mirror stem, about 20 to 30 cm from your mouth and aimed at your face. Keep it out of direct vent airflow and clear of any trim that blocks the grille.
Does a wired to wireless carplay adapter affect the microphone?
No. The adapter sits in the USB path and the mic stays on its own 3.5mm circuit. Install and test the mic first, then add the adapter, so you know which part caused any problem.
Why does my new mic sound quiet or distant on calls?
Usually the capsule is too far away or the radio's mic gain is low. Move the capsule closer to your face, run the gain setting in a quiet space, then re-test at highway speed.
Is there a discount code for these parts?
Yes, the store page carries the current offer, which is 10% off sitewide. Check the store page for the live code, shipping details and the return and warranty terms before ordering.