
Axiom Racks Installation: What Tools Do You Actually Need?

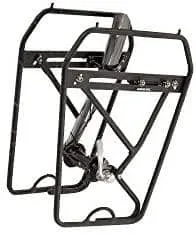
What Tools Do You Need to Install Axiom Racks?
Installing axiom racks on your touring bike requires just a handful of basic tools, though the exact set depends on your specific rack model and frame. Most Axiom bike rack installations need 4mm and 5mm hex keys, a Phillips screwdriver, and potentially an adjustable wrench for mounting hardware. We've installed dozens of racks on our touring setups, and we'll walk you through exactly what to have on hand before you start.
Essential Tools for Most Axiom Bike Rack Installations
The core toolkit for mounting axiom racks covers about 90% of installations. Here's what we keep within reach every time:
- 4mm and 5mm hex keys – the workhorses for rack arm bolts and frame eyelets
- Phillips #2 screwdriver – for pannier rail hardware and some seat stay mounts
- 8mm and 10mm wrenches or an adjustable wrench – if your frame uses nuts instead of threaded eyelets
- Torque wrench (optional but recommended) – prevents over-tightening aluminum components
Most Axiom models, including the popular Axiom Streamliner Disc DLX rear rack and the Axiom Streamliner Road, ship with all necessary mounting bolts and spacers. You're simply providing the drivers. Check your current pricing and our discount code before ordering to grab 15% off.
Model-Specific Tool Requirements
Different Axiom rack families have subtle hardware differences. Here's what changes depending on which model you're mounting:
| Rack Model | Hex Key Sizes | Additional Tools |
|---|---|---|
| Axiom Streamliner Disc | 4mm, 5mm | Adjustable wrench for disc caliper clearance check |
| Axiom Streamliner 29er DLX | 5mm, 6mm | Longer hex key for recessed seatstay mounts |
| Axiom Streamliner Road | 4mm, 5mm | None |
The Axiom Streamliner 29er DLX often requires a ball-end hex key for the upper seatstay mounts because the angle can be tight on some frames. We learned this the hard way after struggling with a standard L-key for twenty minutes on a Trek 520.
When You Need Extra Hardware or Adapters
Not every bike frame has rear rack eyelets in the right places, especially if you're mounting to a disc brake bike or a frame designed for bikepacking setups like a bivy tent 1 person rig. In these cases, you'll need:
- P-clamps or adapter plates – for frames missing lower eyelets (common on carbon and some aluminum frames)
- Longer M5 bolts – if your frame has unusually thick dropouts or you're stacking a fender with the rack
- Threadlocker (blue Loctite) – prevents bolts from vibrating loose on rough touring routes
Axiom bike rack parts are available separately if you lose a spacer or need to replace worn hardware. We always carry a small bag of spares on long tours alongside essentials like our bivy sack tent and navigation gear.
Installation Tips That Save Time and Frustration
We've mounted Axiom racks on everything from loaded touring bikes to lightweight credit-card setups, and these tricks consistently make the process smoother:
Start loose, tighten last. Thread all four mounting points finger-tight before you torque anything down. This lets the rack self-align and prevents binding that can crack aluminum stays.
Use a torque wrench on carbon and aluminum frames. Axiom recommends 4-5 Nm for M5 rack bolts. Over-tightening can crack eyelets or strip threads, especially on lightweight frames.
Check disc brake rotor clearance. On models like the Axiom Streamliner Disc DLX rear rack, spin the wheel after installation to confirm the rack stays clear of the rotor. Even 2mm of contact will wear through aluminum in a few hundred miles.
Test with weight before you leave. Load your panniers with 15-20 pounds per side and ride around the block. Listen for creaks or rattles that signal a loose bolt or misaligned stay. For shorter trips where you're only packing a bivy tent and essentials, you may not notice installation issues until you're fully loaded.
How Long Does Axiom Rack Installation Actually Take?
Plan for 20 to 30 minutes if your frame has standard eyelets and you've gathered your tools beforehand. First-time installations or frames requiring adapters can stretch to an hour. We always budget extra time on tour when swapping racks or troubleshooting, especially if we're also calibrating a Cycle igpsport or adjusting other components.
If you're comparing an Axiom racks review to competitor brands, installation complexity is similar across the board. Tubus and Topeak use the same M5 mounting standard, so your toolkit carries over.
Do You Need Professional Installation?
Most touring cyclists handle Axiom bike rack installation themselves. If you're comfortable adjusting a derailleur or bleeding brakes, you'll have no trouble. A bike shop will charge $20 to $40 for the service, which makes sense if you don't own hex keys or if your frame needs custom adapter fabrication.
We recommend a professional fitting if you're mounting a rack to a full-suspension frame, an older steel frame with misaligned eyelets, or a high-end carbon bike where you're nervous about torque specs. For standard touring frames, grab the tools, check our discount code for 15% off your order, and knock it out in your garage.
Frequently asked questions
What size hex key do I need for Axiom racks?
Most Axiom rack models require 4mm and 5mm hex keys for the mounting bolts. The Axiom Streamliner 29er DLX may also need a 6mm key for certain seatstay mounts depending on your frame.
Can I install an Axiom rack without rack eyelets on my frame?
Yes, you can use P-clamps or adapter plates to mount Axiom racks on frames that lack eyelets. You'll need an adjustable wrench or socket set to tighten the clamp hardware securely.
Do Axiom racks come with all the mounting bolts?
Axiom racks ship with all necessary bolts, washers, and spacers for standard installations. If your frame requires longer bolts or adapters, you'll need to source those separately.
How tight should I torque Axiom rack bolts?
Axiom recommends 4 to 5 Nm of torque for M5 rack mounting bolts. Use a torque wrench on aluminum and carbon frames to avoid stripping threads or cracking eyelets.
Will the Axiom Streamliner Disc work with my disc brake bike?
Yes, the Axiom Streamliner Disc and Disc DLX models are designed for disc brake clearance. Always spin your wheel after installation to confirm the rack stays clear of the rotor.
How long does it take to install an Axiom bike rack?
Installation takes 20 to 30 minutes on a frame with standard eyelets if you have your tools ready. Frames requiring adapters or custom fitting can take up to an hour.