
Installing a Yose Power Electric Bike Conversion Kit: What You Need to Know Before You Start

Installing a Yose Power Electric Bike Conversion Kit: What You Need to Know Before You Start
An electric bike conversion kit transforms your standard bicycle into a pedal-assist or throttle-controlled e-bike without buying a complete new bike. Yose Power kits give you the motor, battery, controller, and display needed to electrify almost any bike frame, but success depends on checking compatibility, gathering the right tools, and understanding your power needs before you start the install.
Why Choose an Electric Bike Conversion Kit Over a New E-Bike
Converting your existing bike costs a fraction of buying a factory e-bike and lets you keep the frame, saddle, and components you already trust. A quality electric bicycle hub motor kit from Yose Power typically runs hundreds rather than thousands, and you control the final setup. You can match the motor size to your terrain, pick the battery voltage for your range goals, and upgrade in stages without replacing the entire bike.
Conversion kits also suit riders who own a high-end road or mountain bike frame and want electric assist without abandoning their investment. Yose Power systems work with most standard frames that have 26-inch, 27.5-inch, or 29-inch wheels and sufficient dropout spacing for the hub motor. Many riders compare conversion kits before committing, so understanding your frame and riding style ahead of time saves returns and frustration.
What Comes in a Yose Power Conversion Kit
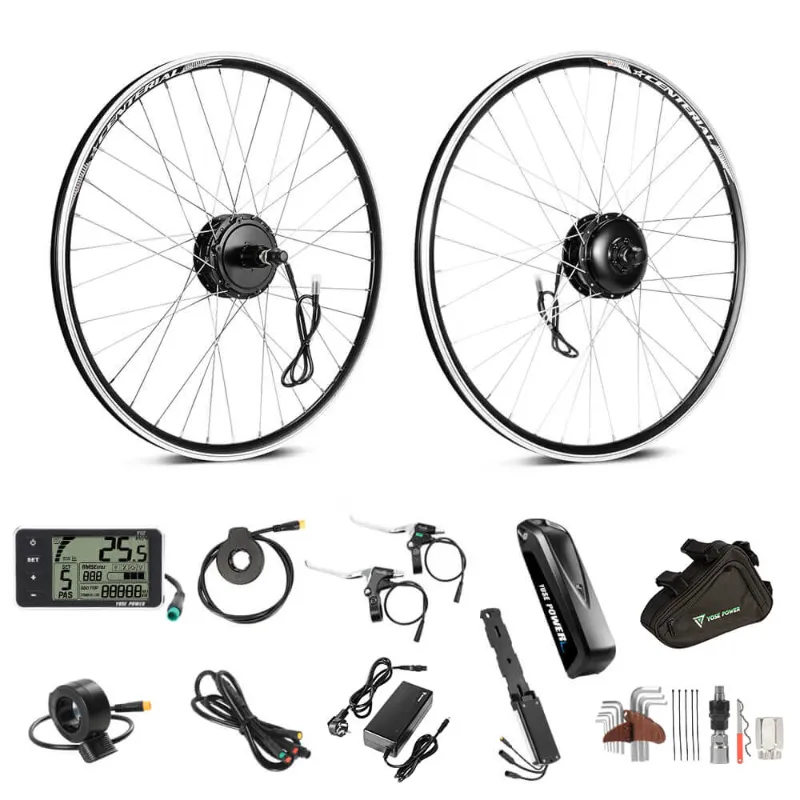
Most Yose Power power bike kits include a front or rear hub motor laced into a wheel, a controller box, a wiring harness, a handlebar-mounted LCD display, brake levers with motor cutoff switches, and a throttle. The motor is the heart of the system and typically ranges from 250W to 1000W, with higher wattage delivering more torque for hills or cargo. The controller manages current flow and connects the battery to the motor, while the display shows speed, battery level, and pedal-assist level.
Battery options are sold separately or bundled depending on the package. Common choices include a batterie e bike 36v for flat commutes, a 48 volt battery electric bike for better hill climbing, or a 36v 10.5ah pack for lighter riders prioritizing weight savings. Voltage determines top speed and torque, while amp-hours dictate range. A 36V 10Ah battery generally delivers 25 to 40 miles on pedal assist, while a 48V 13Ah pack can push 40 to 60 miles depending on rider weight and terrain.
You will also need a converter e bike controller if you plan to upgrade motor wattage later or switch between different voltage batteries. Some kits include an ebike battery cover to protect your pack from road spray, which we recommend for year-round riders.
Tools and Skills Required for Installation
Installing a hub motor kit requires basic mechanical skills and a few common bike tools. You will need a set of Allen keys, an adjustable wrench, a pedal wrench, wire cutters, zip ties, and possibly a torque wrench if you want to meet manufacturer specs exactly. The hardest part is usually replacing your existing wheel with the motorized wheel and routing the cable harness neatly along the frame.
Most riders complete the install in two to four hours on their first attempt. If you have changed a bike tire, adjusted brakes, or installed new handlebars, you already have the core skills. Yose Power kits ship with illustrated manuals and many YouTube walkthroughs exist for their most popular models. The wiring uses color-coded connectors that plug together without soldering, so electrical experience is not required as long as you match the correct plugs.
The trickiest compatibility issue is rear dropout spacing. Older road bikes may have 130mm spacing while the motor hub measures 135mm or 142mm, requiring you to spread the frame slightly or use spacing washers. Front hub motors avoid this problem entirely but add weight to your steering, which some riders dislike. Check your frame material before spreading dropouts; steel and aluminum frames tolerate small adjustments, but carbon frames risk cracking and typically need a front motor or a professional install.
Choosing the Right Battery Voltage and Capacity
Battery choice directly impacts your range, speed, and how the bike handles hills. A 24v ebike battery works for lightweight riders on flat terrain but struggles with grades or headwinds. Most adults find 36V or 48V systems offer the best balance. A 36V setup reaches 20 to 22 mph with pedal assist and feels smooth for urban commuting, while a 48V pack hits 25 to 28 mph and delivers noticeably stronger hill performance.
Amp-hour rating controls how far you ride before recharging. Multiply voltage by amp-hours to get watt-hours, the true measure of capacity. A 36V 10Ah battery holds 360 Wh, enough for 25 to 35 miles of mixed riding. A 48V 13Ah battery holds 624 Wh and can stretch to 50 miles if you keep assist levels low and pedal consistently. Heavier riders, cargo haulers, and anyone tackling steep grades should budget 15 to 20 Wh per mile; lighter riders on flat paths can achieve 10 Wh per mile or better.
Yose Power batteries mount either to a rear rack, inside a triangle bag, or on the downtube with a cradle. Rack mounts keep weight low and centered but require a sturdy rack. Downtube mounts look cleaner and improve handling but may interfere with water bottle cages. Grab the code for €10 off any Yose Power kit or battery before you order, which helps offset the cost of a larger capacity pack.
Step-by-Step Installation Overview
Start by removing your existing front or rear wheel depending on where the motor will live. Loosen the brake caliper or rim brake arms so the new motorized wheel clears, then slide the axle into the dropouts and tighten the nuts or quick-release skewer to manufacturer torque. Make sure the motor cable exits toward the bottom bracket and does not wrap around the fork or stay.
Next, mount the controller box under the downtube or on the rear rack using zip ties or the included brackets. Route the motor cable to the controller, plug in the matching connector, then run the battery cable from the controller to wherever your battery will mount. Attach the display to your handlebar using the clamp bracket, connect its cable to the controller, and install the brake levers with motor cutoff switches by removing your old levers and sliding the new ones onto the bar.
Finally, connect the throttle if your kit includes one, secure all cables with zip ties along the frame tubes to prevent snagging, and double-check every connector is seated fully. Charge your electric bicycle engine kit battery to full, slide it into its mount, turn on the display, and test the throttle and pedal assist in a safe area before hitting the road. If the motor does not engage, check that the brake cutoff switches are not stuck in the open position and that the battery is outputting voltage with a multimeter.
Common Pitfalls and How to Avoid Them
The most frequent mistake is choosing a motor that does not fit your frame's dropout width or axle type. Measure your existing axle spacing before ordering and confirm whether you have quick-release or thru-axle dropouts. Yose Power lists compatibility specs on each product page, and checking the latest price also shows the full technical details in the bundle description.
Another issue is underestimating cable length. Yose Power cables are pre-cut, so plan your controller and battery placement before you start cutting zip ties or drilling frame mounts. If you place the controller too far from the motor, the cable may not reach without splicing, which voids most warranties.
Battery mounting deserves careful thought. A rear rack mount works well for cargo bikes and touring setups but adds weight high on the bike, affecting handling. A downtube cradle keeps the center of gravity low but may require drilling into your frame if no bottle-cage bosses exist in the right spot. Some riders opt for a triangle bag with a soft-shell ebike battery cover to protect against weather without permanent mounting hardware.
Finally, always test your brakes after installation. Motor cutoff switches must kill power the instant you squeeze the lever, or you risk a runaway throttle situation. Adjust brake lever reach so the switches engage before the pads contact the rim or rotor, and verify cutoff function by squeezing each lever while the throttle is active.
Where to Buy and How to Save on Your Yose Power Kit
Yose Power sells direct through their website and ships across Europe and North America. Kits start around the price of a mid-range weekend away and scale up depending on motor wattage and whether you bundle a battery. We track active discount codes year-round, and right now you can check the latest price and snag €10 off sitewide, which stacks with seasonal sales on battery packs and wheel sizes.
Before you buy, compare your needs against the available configurations. A electric bicycle hub motor kit with a 500W rear motor and 36V battery suits most commuters, while riders tackling mountain passes or hauling kids benefit from a 750W or 1000W system paired with a 48 volt battery electric bike pack. Yose Power offers 12-month warranties on electronics and 24 months on batteries, so buying direct protects your investment better than third-party marketplaces.
If you already own a compatible bike and basic tools, a Yose Power conversion kit delivers e-bike performance without the e-bike price tag. Plan your battery placement, double-check frame compatibility, and set aside a weekend afternoon for the install. Your legs will thank you on the first long climb.
Frequently asked questions
Can I install a Yose Power electric bike conversion kit on any bicycle?
Most standard bikes with 26-inch, 27.5-inch, or 29-inch wheels work, but you need to verify dropout spacing matches the hub motor width and that your frame is steel or aluminum if rear dropout spreading is required. Carbon frames and bikes with unusual axle standards may need professional fitting.
What is the difference between a 36V and 48V battery for my conversion kit?
A 36V battery provides smooth pedal assist up to 20 to 22 mph and works well for flat commuting, while a 48V battery reaches 25 to 28 mph and delivers stronger torque for hills and heavier loads. Higher voltage also improves controller efficiency under load.
How long does it take to install a hub motor conversion kit?
Most riders complete installation in two to four hours on their first attempt if they have basic bike maintenance skills. The process involves swapping a wheel, mounting the controller and battery, routing cables, and installing the display and brake levers.
Do I need to charge the battery before first use?
Yes, charge your battery to full before the first ride. Lithium-ion cells ship at partial charge for safety, and a full charge cycle ensures the battery management system calibrates correctly and gives you accurate range estimates on the display.
Can I use my existing bike brakes with a Yose Power kit?
You can keep your existing brake calipers or rim brakes, but you must replace the brake levers with the motor cutoff levers included in the kit. These levers cut power to the motor the instant you squeeze, which is a critical safety feature.
Where can I find a discount code for Yose Power conversion kits?
We maintain an up-to-date Yose Power discount code page with current offers. Right now you can save €10 sitewide, and the page shows which bundles qualify for additional seasonal discounts on batteries and accessories.