
How to Knit Santa Socks: A Complete Pattern Guide for Holiday Gifts

Why a Santa Socks Pattern Is Perfect for Holiday Knitting
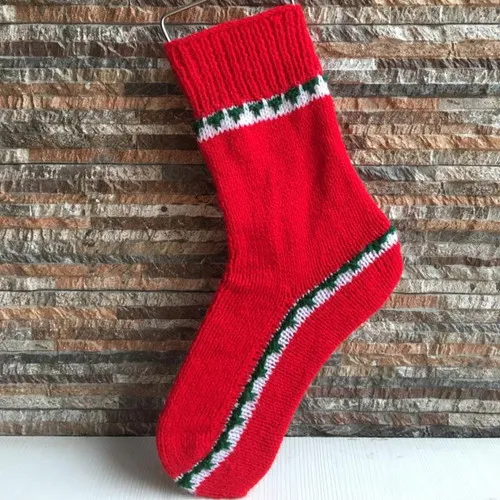
A santa socks pattern transforms basic sock knitting into a festive project that friends and family will treasure every December. These cheerful designs typically feature red and white stripes, pom-pom cuffs, or Fair Isle motifs that capture Santa's iconic look. Whether you're an experienced sock knitter or tackling your first pair, a well-written pattern guides you through shaping the heel, creating the ribbed cuff, and adding those playful Santa-inspired details that make holiday knitting so rewarding.
We tested multiple designs and found that the santa socks pattern offers clear instructions for knitters who want cozy, gift-worthy results without wrestling through vague abbreviations or confusing charts.
Choosing Your Yarn and Needles for Santa-Themed Socks
The right materials make or break your sock project. For a durable, comfortable santa socks pattern, we recommend fingering-weight yarn (also called sock yarn) that contains at least 20% nylon for reinforcement. Superwash merino blends wash well and feel soft against the skin, which matters when someone wears your handmade gift all day.
Yarn requirements:
- 300 to 400 yards total for adult sizes
- Red and white for classic Santa stripes (or a single self-striping colorway)
- Optional green or black for accents
Needle sizes:
- US 1 to 2 (2.25 to 2.75 mm) circular needles or double-pointed needles
- Match the gauge listed in your pattern, usually 7 to 8 stitches per inch
If you're new to Christmas socks pattern knitting, stick with smooth yarn in light colors so you can spot mistakes easily. Fuzzy or splitty yarn slows down your progress and obscures stitch definition.
Step-by-Step: Knitting the Cuff and Leg
Most santa socks patterns start at the cuff and work down toward the toe (called top-down construction). This approach lets you try on the sock as you go and adjust the leg length to suit the recipient.
Cast on and ribbing:
- Cast on 60 to 72 stitches (depending on size) and join in the round, being careful not to twist
- Work k2, p2 ribbing for 1.5 to 2 inches to create a stretchy, stay-up cuff
- Switch to your Santa colorwork or stripe pattern for the leg
Leg shaping:
- Continue in stockinette (knit every round) or your chosen colorwork chart
- Work 6 to 8 inches from cast-on edge for a standard crew-length sock
- Keep tension even so stripes or Fair Isle motifs lie flat
Many festive designs incorporate a simple two-row stripe (two rounds red, two rounds white) that mimics Santa's suit without requiring you to carry multiple colors in one round. Check the latest price on the pattern we recommend for full colorwork charts and sizing options.
Turning the Heel and Shaping the Gusset
The heel turn is where many knitters feel intimidated, but a clear santa socks pattern breaks it into manageable short rows. We walk through a traditional heel flap and gusset here, which creates a durable, well-fitting heel pocket.
Heel flap:
- Work back and forth on half your stitches (30 to 36 sts) for about 2 to 2.5 inches
- Slip the first stitch of every row to create a chain edge that makes picking up gusset stitches easier
Heel turn:
- Follow your pattern's short-row shaping to create a right-angle turn
- You'll work decreases at the end of each short row until you've turned the corner
Gusset pickup:
- Pick up stitches along both sides of the heel flap
- Decrease every other round until you return to your original stitch count
The Free Knitted Santa Christmas Stocking Pattern resource offers helpful visuals for heel construction if you're a visual learner, though stocking patterns differ slightly from sock construction.
Finishing the Foot and Toe
Once the gusset decreases are complete, you'll knit straight on all stitches for the foot length. Measure from the back of the heel to about 2 inches shorter than the total foot length before starting toe shaping.
Toe shaping options:
| Toe Type | Best For | Rounds to Decrease |
|---|---|---|
| Wedge | Narrow feet, easy shaping | 8 to 12 |
| Round | Average feet, smooth fit | 10 to 14 |
| Star | Wide feet, extra room | 12 to 16 |
Work your decreases evenly (usually at four points around the toe) until 8 to 12 stitches remain, then cut the yarn and thread the tail through the live stitches with a tapestry needle. Pull tight and weave in the end on the inside of the sock.
For a true Santa touch, knit a tiny pom-pom in white yarn and tack it to the cuff's fold line. This playful detail makes your santa socks pattern instantly recognizable as holiday wear.
Sizing and Fit Tips for Gift Knitting
Socks need to fit snugly without cutting off circulation. Measure the recipient's foot circumference at the widest part (usually across the ball of the foot) and choose a pattern size that offers about 10% negative ease. A 9-inch foot circumference works well with a sock that measures 8 to 8.5 inches around.
Quick sizing guide:
- Child (shoe size 12 to 3): 48 to 56 stitches
- Women's medium (shoe size 7 to 9): 60 to 64 stitches
- Men's large (shoe size 10 to 12): 68 to 72 stitches
If you don't know the recipient's measurements, adult medium is a safe bet for most women, and large works for most men. You can always grab the code for 20% off your pattern purchase and knit a second pair in a different size once you confirm fit.
Some knitters prefer quilted or patchwork fabric stockings for mantel decoration. If you're exploring broader holiday sewing projects, a quilted christmas stocking or patchwork christmas stocking pattern with batting creates a completely different look. For quilters interested in efficient construction, a quilt as you go christmas stocking method layers fabric and christmas stocking with batting as you sew, eliminating separate quilting steps. The Vintage Santa Stocking Pattern offers a classic fabric alternative if you want to switch crafts mid-season.
Caring for Your Finished Santa Socks
Hand-knit socks last for years when you care for them properly. Superwash wool tolerates machine washing on a gentle cycle, but air drying preserves elasticity and prevents felting. Turn socks inside out before washing to protect any colorwork on the outside.
Washing tips:
- Use wool wash or gentle detergent without enzymes
- Cold or lukewarm water only
- Lay flat or hang to dry, never tumble dry
- Store folded (not balled up) to maintain cuff stretch
If you used non-superwash yarn, hand wash only in cool water and roll in a towel to remove excess moisture before air drying. The extra care is worth it when your recipient pulls on those cozy, festive socks every December for years to come.
Ready to cast on your first pair? Explore the full santa socks pattern with detailed charts and video support, and don't forget to check current pricing with our exclusive discount code for the best deal on holiday knitting patterns.
Frequently asked questions
How long does it take to knit a santa socks pattern?
An experienced sock knitter can finish a pair in 10 to 15 hours, while beginners may need 20 to 25 hours. Colorwork and detailed motifs add time, but simple stripes work up quickly.
Can I use thicker yarn for faster knitting?
Yes, you can substitute DK or worsted weight yarn and larger needles for a bulkier sock that knits faster. Adjust your cast-on to fewer stitches to maintain the same circumference, and expect a thicker, warmer result.
Do I need special needles for sock knitting?
You can use double-pointed needles, two circular needles, or one long circular for magic loop. Choose the method that feels most comfortable in your hands; all three produce identical results.
What's the best way to make matching pairs?
Take detailed notes on your first sock, including exact row counts for the leg and foot. Weigh your yarn ball after finishing the first sock to confirm you have enough for the second, and knit them one at a time or try two-at-a-time on one long circular.
Can beginners knit Santa-themed holiday socks?
Yes, if you're comfortable knitting in the round and following a pattern. Start with a simple stripe design rather than complex Fair Isle charts, and choose a pattern with clear instructions and progress photos.
How do I prevent color jogs in striped socks?
When changing colors at the beginning of a round, slip the first stitch of the new color purlwise to disguise the jog. Alternatively, work a traveling join by knitting into the stitch one row below at the color change.