
What Parts Wear Out First on Youth Dirt Bikes? (And How to Replace Them)

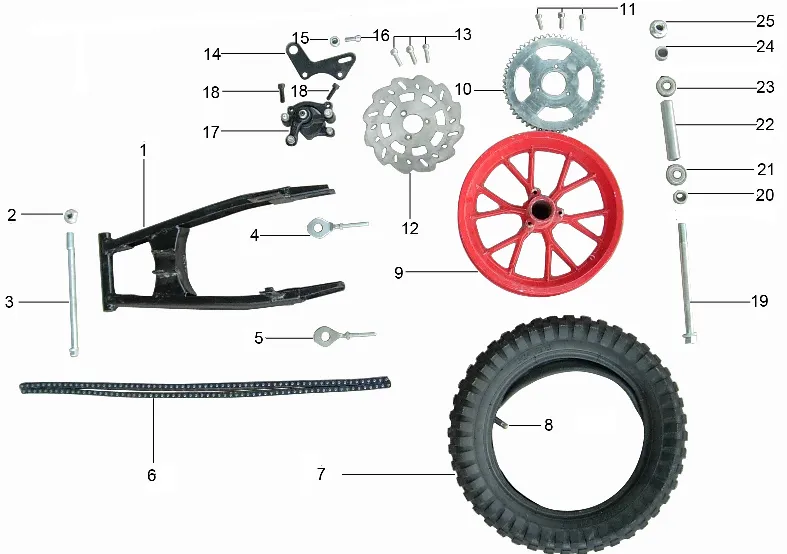
Youth dirt bikes wear through tires, brake pads, chains, sprockets, and air filters faster than any other components. These five parts absorb the brunt of beginner riding—hard braking, inconsistent throttle control, and dusty trails—and typically need replacement every 20 to 40 hours of ride time depending on terrain and rider skill.
We've tested dozens of models from SYX MOTO 50cc entry bikes to full-size 125cc dirtbike machines, and the wear pattern is remarkably consistent across gas and electric platforms. Understanding what fails and why saves you money and teaches your rider basic mechanical responsibility.
Tires Lose Tread Fast on Youth Dirt Bikes
Knobby tires wear fastest because young riders often skid, spin out, or ride on pavement between trails. Rear tires typically wear 30 to 50 percent faster than fronts due to power delivery and braking load.
Signs your tires need replacement:
- Knobs worn flat or rounded at the tips
- Visible cords or fabric through the rubber
- Cracks in the sidewall from UV exposure or low pressure
- Loss of traction in loose dirt or mud
How to replace them:
- Break the bead with a tire spoon or bead breaker tool
- Remove the valve core and deflate completely
- Work two tire spoons around the rim to lift one bead off
- Pull the tube out, then remove the second bead
- Mount the new tire starting opposite the valve stem
- Inflate slowly and check bead seating on both sides
We recommend checking tire pressure before every ride—most youth dirt bikes run 10 to 12 psi, far lower than street bikes, and correct pressure extends tread life significantly.
Brake Pads Wear Thin in Dusty Conditions
Brake pads on dirt bikes for 10 year olds and older riders wear quickly because trail dust acts as an abrasive between pad and rotor. Front brakes do most of the work and wear about twice as fast as rear pads.
Check pads every 10 hours:
- Remove the wheel and caliper
- Measure pad material—replace when less than 1.5 mm thick
- Inspect for uneven wear, glazing, or embedded debris
Replacement steps:
- Remove the caliper bolts and slide the caliper off the rotor
- Push the pistons back with a flat screwdriver or C-clamp
- Remove the retaining pin or clip and slide out old pads
- Insert new pads and reinstall the clip
- Pump the brake lever several times to seat the pistons before riding
Order dirt bike parts in advance so you're never waiting on a wear item. Pads are cheap insurance compared to warped rotors.
Chain and Sprockets Stretch and Wear Together
Chains stretch from load cycling, and sprockets develop hooked teeth from that wear. Both need replacement together once the chain won't adjust tight enough or the sprockets show visible shark-fin profiles.
Inspection checklist:
- Pull the chain away from the rear sprocket—if you see daylight behind more than half a tooth, replace both
- Check for tight spots by rotating the wheel in neutral
- Look for rust, kinked links, or missing o-rings
How to replace:
- Loosen axle nut and chain adjusters
- Break the master link with pliers or a chain tool
- Remove old chain and count the links
- Remove sprocket bolts (front requires clutch cover removal)
- Install new sprockets and torque bolts to spec
- Route new chain and connect the master link with the closed end facing rotation direction
- Adjust tension to 25–35 mm slack midway between sprockets
Lubricate every 2 to 3 rides with dedicated o-ring chain lube, never WD-40. Dirt bikes for 12 year olds and up put serious load on chains, especially gas powered dirt bikes with 110cc or larger engines.
Air Filters Clog Fast and Choke Performance
A clogged air filter robs power and lets fine dust reach the cylinder, causing premature piston and ring wear. We've seen filters on electric mini dirt bike models last longer than gas versions because there's no oil mist, but all bikes need filter service every 3 to 5 rides in dry conditions.
Service procedure:
- Remove the seat and side panel to access the airbox
- Release the cage clips and pull out the foam filter
- Wash in warm soapy water or dedicated foam filter cleaner
- Rinse thoroughly and squeeze out water (never twist or wring)
- Let dry completely, then apply foam filter oil evenly
- Squeeze to distribute oil, then reinstall
Carry a spare filter so you can swap a clean one mid-ride if you're hitting deep dust. Filters cost a few dollars but prevent hundred-dollar top-end rebuilds.
Clutch Cables Fray at the Lever and Adjuster
On manual-shift models like the moto 125 dirt bike, clutch cables fray from repeated bending and exposure to dirt. Fraying usually starts at the lever perch or the lower adjuster barrel where the cable radius is tightest.
Symptoms:
- Stiff or sticky clutch pull
- Difficulty finding neutral
- Visible strands of wire poking through the housing
Replacement steps:
- Loosen the adjuster barrel at the lever and thread it out
- Disconnect the cable from the clutch lever perch
- Follow the cable down to the engine case and loosen the lower adjuster
- Remove the cable from the clutch arm and pull free
- Route the new cable along the same path, securing any clamps
- Adjust freeplay to 10–15 mm at the lever tip
Lubricate cables every few rides by lifting the rubber boot and spraying cable lube down the housing. This simple step doubles cable life.
Spark Plugs Foul in Small-Displacement Engines
Youth dirt bikes for sale with 50cc to 110cc two-stroke or four-stroke engines can foul plugs from rich jetting, low-speed putting, or cheap fuel. A fouled plug causes hard starting, rough idle, and weak acceleration.
Check plugs every 15 to 20 hours:
- Remove the plug and inspect the electrode color
- Light tan or gray is ideal
- Black soot means too rich or oil fouling
- White or blistered means too lean (check jetting immediately)
Replacement:
- Disconnect the spark plug cap
- Use a deep socket (usually 16 mm or 18 mm) to unscrew the plug
- Gap the new plug to spec (typically 0.6–0.7 mm)
- Thread it in by hand, then snug with the socket—do not overtorque
- Reconnect the cap and test start
Keep a spare plug in your gear bag. They're the cheapest and fastest fix for a no-start situation on the trail.
Where to Buy Replacement Parts and Save
We stock all the common wear items for SYX MOTO models, and you can grab the code at our discount page for 5% off your order. Whether you're maintaining a mini dirt bike electric for a 7 year old or a youth dirt bikes 125cc model for a teenager, buying parts in small batches before you need them keeps your rider on the trail.
OEM parts fit best, but aftermarket chains, brake pads, and filters from quality suppliers often match or exceed original specs at half the price. Check the latest price and bundle your order to save on shipping.
Teach Your Rider to Spot Wear Early
The best maintenance plan involves your young rider. Walk them through a pre-ride check: tire pressure, chain tension, brake lever feel, and a quick visual scan for leaks or loose bolts. Kids who learn to spot a worn chain or spongy brake before a ride become safer, more confident riders—and they're far less likely to grenade an engine from a neglected air filter.
Most parents find that dirt bikes for 10 year olds and up are the sweet spot for teaching basic wrenching. By the time they're on a full-size bike, they can handle chain adjustments, filter swaps, and tire changes with minimal supervision.
Regular maintenance transforms an affordable youth trail bike from a disposable toy into a reliable machine that lasts for years and multiple riders.
Frequently asked questions
How often should I replace the chain on a youth dirt bike?
Replace the chain every 40 to 60 hours of ride time or sooner if you see tight spots, rust, or visible stretch when you pull it away from the rear sprocket. Always replace the sprockets at the same time.
Can I use automotive brake pads on a youth dirt bike?
No. Dirt bike brake pads use specific friction compounds and backing plate dimensions. Always use pads designed for powersports applications or OEM replacements.
What size dirt bike is right for a 10 year old?
Most 10 year olds fit a 50cc to 110cc dirt bike with a seat height of 24 to 28 inches, depending on their height and experience. Check the manufacturer's sizing guide and let them sit on the bike before buying.
Do electric mini dirt bikes need less maintenance than gas models?
Yes. Electric models skip oil changes, air filter service, and spark plug replacement, but you still need to maintain tires, brakes, chain, and battery connections.
How do I know when youth dirt bike tires are too worn?
Replace tires when the knobs are worn flat, you see cords through the rubber, or traction drops noticeably in loose dirt. Rear tires typically wear out first.
Where can I buy dirt bike parts for SYX MOTO models?
You can order directly from our site and use the discount code at our SYX MOTO coupon page for 5% off all orders, including chains, brake pads, filters, and other wear items.