
How to Clean and Maintain a VEVOR Sewer Camera for Long-Term Use

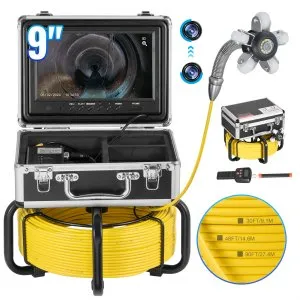
A well-maintained sewer camera delivers crisp imaging and reliable performance for years, while neglect leads to clouded lenses, corroded connectors, and expensive replacements. We've tested drain inspection equipment in real-world conditions and put together this guide to help you protect your investment and keep your VEVOR sewer camera running like new.
Why Regular Sewer Camera Maintenance Matters
Pipe inspection tools face harsh environments: sewage, grease, mineral deposits, and abrasive debris. Every job leaves residue on the camera head, cable, and monitor connections. If you skip cleaning, that buildup hardens and scratches the lens, corrodes seals, and eventually renders the camera useless.
Regular maintenance extends equipment life by three to five times compared to units that never see a wipe-down. You also avoid job delays caused by fogged lenses or cable tangles. Whether you run a plumbing camera daily or rent occasionally, the same care principles apply.
Cleaning the Camera Head and Lens After Every Use
The camera head takes the worst punishment, so clean it immediately after each inspection.
Rinse and wipe routine:
- Pull the cable out fully and rinse the camera head under warm running water to remove loose debris
- Use a soft microfiber cloth to wipe the lens in circular motions (never paper towels, which scratch)
- For stubborn grease or mineral scale, apply a few drops of isopropyl alcohol (70% or higher) to the cloth and gently buff the lens
- Inspect the sapphire or acrylic lens for scratches under bright light; deep scratches require professional replacement
- Dry the head completely with a clean towel before retracting the cable
Avoid these mistakes:
- Harsh chemicals like acetone, bleach, or ammonia degrade rubber seals and lens coatings
- Abrasive scrubbers or brushes gouge the lens surface
- High-pressure air can force water past O-rings into the camera body
If you work in especially dirty lines, keep a small bucket of clean water and a dedicated microfiber towel on the truck for immediate post-job cleaning. For pricing on replacement parts and accessories, check the latest price on the VEVOR store.
Cable Care and Storage Best Practices
The push cable is the second most vulnerable component. Kinks, twists, and dirt trapped in the coils shorten its life and damage the internal wiring.
Retraction and coiling:
- Wipe the cable with a damp cloth as you retract it to remove slime and grit
- Guide the cable evenly onto the reel; overlapping layers cause kinks
- Never force a twisted cable back into the drum; stop, untwist by hand, then continue
- Store the reel indoors or in a weatherproof case to prevent UV damage and freezing
Lubrication:
- Apply a thin coat of silicone spray or cable lubricant every 10 to 15 uses
- Work the lubricant in by running the cable out and back once
- Wipe off excess to avoid attracting dirt
If your cable develops a permanent set or kink, replace it before it snags inside a pipe. Many professionals who compare models from Ridgid and Milwaukee emphasize that cable care is the single biggest factor in long-term durability.
Monitor, Connector, and Battery Maintenance
The display unit and power system need attention too, even though they stay above ground.
Monitor cleaning:
- Wipe the screen with a dry microfiber cloth weekly
- For fingerprints or smudges, lightly dampen the cloth with water (never spray liquid directly on the screen)
- Clean the ventilation slots with compressed air to prevent overheating
Connector care:
- Inspect the multi-pin connector on the cable and monitor for corrosion or bent pins after every job
- Wipe connectors with isopropyl alcohol on a cotton swab if you see residue
- Apply a tiny amount of dielectric grease to protect against moisture (optional but recommended in wet climates)
Battery best practices:
- Charge lithium-ion batteries to 50-80% for storage if you won't use the camera for more than a week
- Avoid deep discharge; recharge when the indicator drops below 20%
- Store batteries in a cool, dry place (ideally 50-70°F)
If you're shopping for inspection gear and want to see how VEVOR stacks up against other sewer cameras for any inspection, our comparisons focus on real-world reliability and maintenance ease.
Troubleshooting Common Issues
Even with proper care, small problems crop up. Here's how to address the most frequent ones without a service call.
| Issue | Likely Cause | Quick Fix |
|---|---|---|
| Blurry or foggy image | Dirty lens or moisture inside | Clean lens; if internal fog persists, check seals |
| Flickering screen | Loose connector or low battery | Reseat cable connector, charge battery |
| Cable won't retract smoothly | Debris in drum or overlapping coils | Pull cable out, clean reel, rewind evenly |
| No power | Dead battery or tripped breaker | Charge battery, check power connections |
For persistent electrical issues or cracked housings, contact VEVOR support rather than attempting DIY repairs that void the warranty. You can grab the code for 8% off parts and accessories sitewide.
Storage Tips for Seasonal or Occasional Use
If your inspection camera sits idle for weeks or months, proper storage prevents corrosion and component failure.
- Clean everything thoroughly: Residual sewage accelerates rust and seal degradation
- Remove the battery: Store it separately at partial charge
- Store in a climate-controlled space: Extreme heat and cold damage electronics and rubber parts
- Cover the reel: A dust cover or tarp keeps the cable clean
- Check seals and O-rings every six months: Replace any that look cracked or flattened
Occasional users often ask whether buying makes sense versus sewer camera rental for single projects. If you inspect pipes more than twice a year, owning and maintaining your own equipment usually pays off by year two.
Extending the Life of Your VEVOR Inspection Equipment
We've watched well-maintained units log hundreds of inspections over five-plus years, while neglected cameras fail in under a year. The difference comes down to a few minutes of cleaning after every job and thoughtful storage between uses.
Keep spare microfiber cloths, isopropyl alcohol, and silicone lubricant in your truck or tool bag so you're never tempted to skip a cleaning. Treat the camera head and cable like precision tools, because that's exactly what they are. Your VEVOR sewer camera will reward that care with sharp video and trouble-free operation for the long haul.
For a side-by-side look at features and pricing across brands, Grainger's inspection camera catalog offers a helpful reference point. And when you're ready to stock up on cleaning supplies or replacement parts, visit our VEVOR coupon page for the latest sitewide discount.
Frequently asked questions
How often should I clean my sewer camera lens?
Clean the lens after every single use, even quick inspections. Sewage and mineral deposits harden quickly and scratch the lens if left to dry.
Can I use household glass cleaner on the camera head?
No. Glass cleaners contain ammonia and other chemicals that degrade rubber seals and lens coatings. Stick to water and isopropyl alcohol on a microfiber cloth.
What's the best way to store a plumbing camera between jobs?
Clean and dry all components, remove the battery, and store the reel in a climate-controlled space away from extreme heat or cold. Cover the cable to keep dust off.
How do I know when to replace the camera cable?
Replace the cable if you see permanent kinks, exposed wiring, or cracks in the jacket. A damaged cable can snag in pipes or cause electrical failures.
Does VEVOR offer replacement parts for older sewer camera models?
VEVOR stocks replacement cables, camera heads, and batteries for most current models. Check their support page or contact them directly with your model number to confirm part availability.