
How to Set Up and Maintain a Cold Plunge Tub at Home

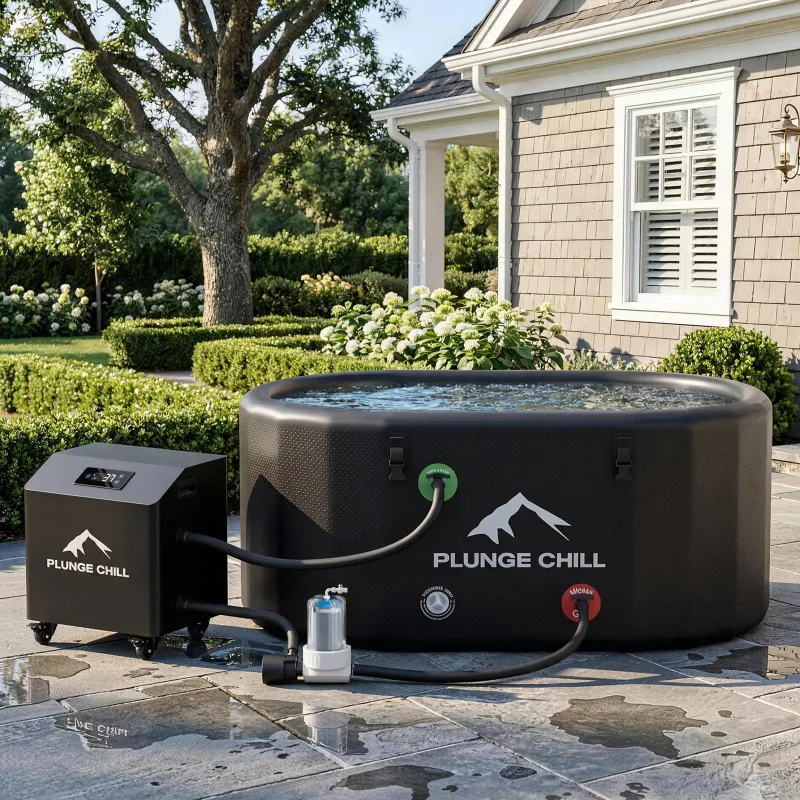
Setting up a cold plunge tub at home involves choosing the right location, installing a water chiller, and establishing a maintenance routine to keep water clean and cold. Whether you invest in a portable cold plunge tub or a permanent ice plunge tub, understanding the setup process and ongoing care ensures you get the full benefits of cold water therapy without the hassle.
We've tested dozens of setups across indoor and outdoor spaces, and we'll walk you through everything from initial installation to weekly maintenance so your cold therapy stays consistent and safe.
Choosing the Best Location for Your Cold Plunge Tub
Your location determines drainage options, power access, and how often you'll actually use your tub. Indoor installations near a bathroom or utility room simplify water changes and provide year-round climate control, while outdoor setups often require weatherproof covers and longer electrical runs.
For outdoor cold plunge tub installations, choose a level surface like a reinforced deck, patio, or concrete pad. Most tubs weigh 1,500 to 2,500 pounds when filled, so verify your surface can handle the load. Indoor spaces need waterproof flooring and nearby drainage, since splashing and water changes are inevitable.
Consider these factors before you commit:
- Electrical access: Most water chiller for ice bath units require a dedicated 15-amp or 20-amp circuit within 10 feet of the tub
- Drainage: A floor drain, sump pump, or garden hose connection makes water changes practical
- Ventilation: Indoor tubs generate humidity, so ensure adequate airflow or a dehumidifier
- Privacy: You'll use your tub more often if the space feels comfortable and secluded
We've found that placing your tub within sight of your daily routine increases adherence. Out of sight often means out of mind.
Setting Up Your Cold Plunge Tub With Chiller
A standalone cold tub holds water but won't maintain therapeutic temperatures without active cooling. That's where a cold plunge chiller comes in. Most chillers connect via standard hose fittings and circulate water through a refrigeration loop, maintaining temperatures between 37°F and 55°F.
Here's our proven setup sequence:
- Position the tub on your chosen surface and confirm it's level using a torpedo level
- Install the chiller nearby, following the manufacturer's clearance specifications (typically 12 inches on all sides for airflow)
- Connect inlet and outlet hoses between the tub and chiller, ensuring the outlet sits below the waterline to prevent air locks
- Fill the tub with a garden hose or utility sink connection, leaving 2 to 3 inches of headroom
- Add sanitizer according to your water treatment plan (we cover this below)
- Power on the chiller and set your target temperature, usually 50°F for beginners
The icebound pro 1hp cold plunge chiller we tested dropped water temperature from 72°F to 50°F in about 4 hours for a 100-gallon tub. Larger tubs or higher ambient temperatures extend that timeline. For current pricing on chillers and tubs, grab the code before you buy.
If you're using an inflatable ice bath or portable ice bath, setup is faster but requires more frequent water changes since these models often lack integrated filtration.
Water Maintenance and Sanitization
Cold water slows bacterial growth compared to hot tubs, but it doesn't stop it. Without a sanitizer and filtration routine, biofilm, algae, and cloudy water appear within a week. We maintain our test tubs with a combination of filtration, chemical sanitization, and partial water changes.
Daily tasks (2 minutes):
- Skim surface debris with a small net
- Check and adjust sanitizer levels using test strips
Weekly tasks (15 minutes):
- Test pH (target 7.2 to 7.6) and alkalinity (80 to 120 ppm)
- Add chlorine, bromine, or hydrogen peroxide sanitizer as needed
- Rinse or backwash the filter cartridge if your tub includes one
Monthly tasks (30 minutes):
- Drain 25% of the water and refill to dilute dissolved solids
- Deep-clean the filter cartridge with a filter cleaner solution
- Wipe down the interior surfaces with a non-abrasive cloth
For cold plunge tub for home setups without built-in filtration, plan to drain and refill completely every 7 to 10 days. A solstice cold pod plunge ice bath tub with an integrated ozone or UV system extends that interval to 2 to 3 weeks in our experience.
Research from independent testers confirms that water quality directly impacts skin health and overall experience, so consistency matters more than perfection.
Troubleshooting Common Cold Plunge Issues
Even well-maintained tubs encounter hiccups. Here's how we solve the most frequent problems:
| Issue | Cause | Fix |
|---|---|---|
| Water won't cool below 60°F | Undersized chiller or poor insulation | Upgrade to a 1 HP chiller or add an insulated cover |
| Cloudy or foamy water | High organic load or low sanitizer | Shock with chlorine, drain 50%, clean filter |
| Algae on walls | Sunlight exposure or low sanitizer | Move tub to shade, increase sanitizer, scrub walls |
| Chiller cycles on/off rapidly | Low water flow or clogged filter | Clean filter, check hose kinks, verify pump operation |
If your chiller struggles in hot climates, consider a cold plunge tub outdoor model with thicker insulation or place the chiller in a shaded, ventilated area. We've also had success wrapping hoses in foam pipe insulation to reduce heat gain.
For persistent issues, check the latest price on replacement filters and spare parts directly from the manufacturer.
Optimizing Your Cold Therapy Routine
Setup and maintenance serve one goal: consistent access to cold therapy. We've found that routine beats intensity. Starting with 2-minute sessions at 55°F three times per week builds tolerance faster than sporadic 10-minute plunges at 40°F.
Track your sessions in a journal or app, noting water temperature, duration, and how you feel afterward. Most people acclimate within 2 to 3 weeks and naturally extend their time as their cold tolerance improves.
Best practices for sustainable use:
- Keep a thermometer in the tub and verify temperature before each session
- Shower before plunging to reduce body oils and contaminants in the water
- Use a timer or set an alarm so you don't overdo early sessions
- Have a warm towel and dry clothes ready before you start
A cold tub delivers the same physiological benefits as an ice bath without the hassle of draining and refilling with fresh ice daily. Once your routine is dialed in, the tub becomes as automatic as brushing your teeth.
Who Should Invest in a Home Cold Plunge Setup
Cold plunge tub for sale options range from $500 inflatable models to $10,000 permanent installations. We recommend permanent setups with a dedicated chiller for anyone planning to use cold therapy three or more times per week long-term. Athletes recovering from training, people managing chronic inflammation, and wellness enthusiasts see the most value.
If you're testing the waters (literally), start with a plunge pop-up or portable ice bath before committing to a full installation. These models pack away when not in use and help you determine whether cold therapy fits your lifestyle.
For a deeper dive into which models perform best across different budgets and use cases, independent testing from experts offers side-by-side comparisons. We also maintain our own regularly updated reviews.
The upfront effort to set up and maintain your tub pays off in convenience, cost savings versus ice, and the simple fact that you'll actually use it. A well-maintained cold plunge tub delivers years of consistent cold therapy without the daily logistics of filling, icing, and draining.
Frequently asked questions
How often should I change the water in my cold plunge tub?
With proper filtration and sanitization, change water every 2 to 4 weeks. Tubs without filtration need complete water changes every 7 to 10 days to maintain safe, clean conditions.
Can I use my cold plunge tub without a chiller?
Yes, but you'll need to add ice daily to maintain therapeutic temperatures. A chiller automates temperature control and eliminates the ongoing cost and hassle of buying ice.
What temperature should I set my cold plunge tub to?
Beginners should start at 55°F to 60°F and work down to 45°F to 50°F as tolerance builds. Most therapeutic benefits occur between 45°F and 55°F for 2 to 10 minute sessions.
Do I need a dedicated electrical circuit for a cold plunge chiller?
Most 1 HP chillers require a dedicated 15-amp or 20-amp circuit. Check your chiller's specifications and consult a licensed electrician to ensure safe installation and avoid tripping breakers.
How long does it take to cool a cold plunge tub?
A 1 HP chiller typically cools a 100-gallon tub from room temperature to 50°F in 4 to 6 hours. Larger tubs, higher ambient temperatures, or smaller chillers extend that time.
Can I install a portable cold plunge tub indoors?
Yes, as long as you have waterproof flooring, drainage access, and adequate ventilation. Indoor setups work well in basements, bathrooms, or utility rooms with nearby electrical outlets.