
How to Mount an OOSSXX Security Camera: Bracket Placement, Junction Box Use, and Weatherproofing Tips

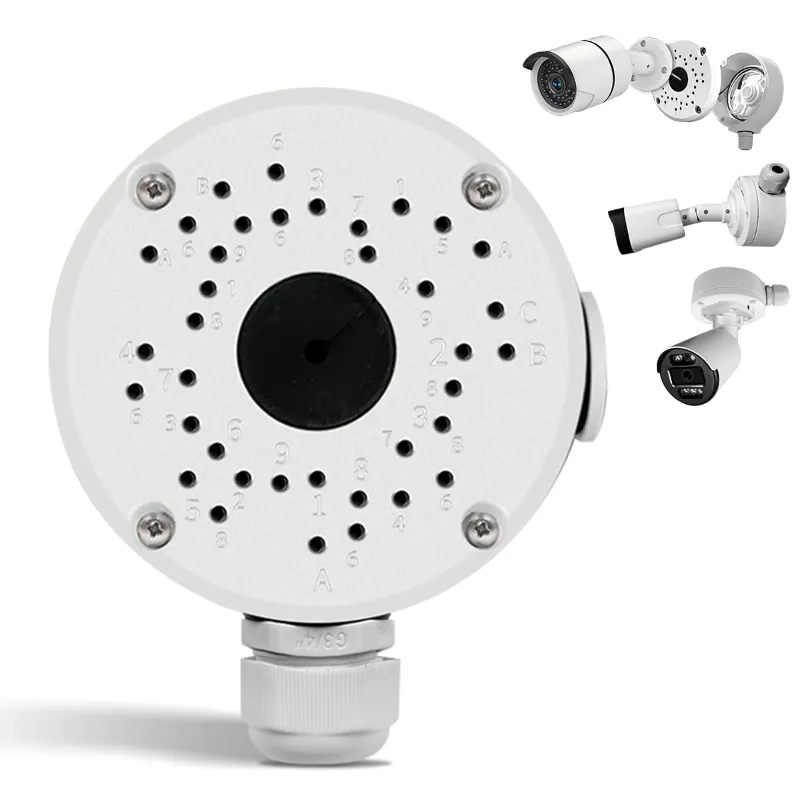
A security camera junction box is the small enclosure that sits between your wall and your OOSSXX camera, hiding the cable connection and protecting it from rain, dust, and tampering. Mounting one correctly takes about 20 minutes, and it is the single cheapest upgrade you can make to a POE security camera system install. In this guide we walk through bracket placement, junction box wiring, and the weatherproofing steps we use on our own test installs.
Why a Security Camera Junction Box Matters for OOSSXX Cameras
Most OOSSXX cameras support direct mounting, but direct mounting leaves the Ethernet pigtail exposed or forces you to drill an oversized hole in your siding. A dedicated security camera junction box solves three problems at once:
- Clean cable management. The POE connection and any field splices stay inside the box instead of dangling in weather.
- Water protection. Water running down the wall cannot wick directly into the connector.
- Tamper resistance. A closed box makes it harder for someone to unplug or damage the connection from the ground.
If you are mounting a poe outdoor camera on brick, stucco, or vinyl siding, we consider the junction box non-negotiable. On protected soffit mounts it is optional but still tidy.
Choosing the Right Box and Bracket for Your Mount
The junction box and the mounting bracket are two different parts, and many OOSSXX camera packages include a bracket only. A security camera mounting bracket sets the camera's angle and standoff distance; the junction box houses the connection behind or below it. When you shop, match three things:
| Component | What it does | What to check |
|---|---|---|
| Junction box | Hides and protects cable connections | Weather rating, gasket, knockouts, size |
| Mounting bracket | Positions and angles the camera | Camera base thread pattern, load rating |
| Combined base | Box and bracket in one unit | Compatibility with your camera's foot |
For a deeper primer on universal box designs and standards, this overview of junction box options for security cameras is worth a read. Shoppers often search for a security camera junction box at Home Depot or Lowe's, and big-box stock works, but a purpose-built CCTV box with a pre-cut camera foot pattern saves drilling time.
Bracket Placement: Where the Camera Actually Goes
Placement drives image quality more than any camera spec. Before you drill anything:
- Pick the height. For entries and driveways, 8 to 10 feet up is our working range: high enough to resist tampering, low enough to capture faces.
- Angle down, not out. Aim the camera across the approach path rather than straight down. A 30 to 45 degree downward tilt on a poe security camera system entry camera catches faces instead of hat tops.
- Mind the backlight. Never point the lens at a rising or setting sun or at a porch light; the exposure will crush detail on the subject.
- Check IR reflection. If the camera has built-in infrared, keep it at least a few inches from the wall so IR does not bounce off the siding and fog the image at night.
- Confirm the wiring path. Trace where the Ethernet run enters the box. On wood siding, drill a pilot hole with a slight downward slope toward the outside so water runs away from the wall.
Mark all four screw holes with the camera's paper template, drill pilot holes, and fill them with a bead of exterior silicone before driving the screws. The silicone step takes 30 seconds and stops water from wicking through the mounting holes.
Installing the Junction Box Step by Step
Here is the sequence we use on every install with a security camera junction box:
- Run the cable first. Fish your POE cable through the wall and leave a service loop inside the box footprint.
- Mount the box. Align the knockouts with your cable entry, seal the back plate with silicone, and screw it to the wall into solid material or anchors.
- Make the connections. Join the camera pigtail to the house run inside the box. If your camera uses RJ45, coil the slack in the box rather than kinking it.
- Seal every entry. Pack the knockout or gland where the cable enters with a weatherproof sealant or a proper compression gland.
- Attach the bracket and camera. Bolt the bracket to the box face, adjust the angle, and snug the locking collar.
- Test before you close it. Power the camera and confirm the video feed and night vision before snapping the lid on. This walkthrough of CCTV junction box installation covers the wiring details well if this is your first one.
Weatherproofing Tips That Actually Matter
A weatherproof box for security camera use is only as good as its seals. In our test yard, failures almost always trace back to one of these:
- Skip the gasket, get water. The rubber gasket on the lid must sit flat and uncompressed. Replace it if it is cracked.
- Drip loops beat drainage holes. Shape the incoming cable into a small U below the box entry so water drips off the loop, not into the box.
- Point the gland down. Any cable gland or knockout should face downward.
- Silicone sparingly. Seal entry points and screw holes, but do not seal the lid shut; you will need back inside.
- Watch condensation. In humid climates, a sealed box breathing through warm days can collect moisture. A small packet of silica gel inside the box is a cheap fix we use on every coastal install.
For extra night reach, some of our long-range test setups pair the camera with an infrared illuminator 850nm or a dedicated ir flood lamp mounted nearby. If you add one, keep it out of the junction box and on its own bracket so the heat has somewhere to go.
Care, Inspection, and When to Upgrade
Check every outdoor junction box twice a year. Open the lid, look for discoloration or water marks, and press the gasket. Reseat any cable that has shifted. If your OOSSXX camera image starts showing fog or spots at night, a wet box or a reflection from the oossxx camera IR window is the usual suspect, and it takes five minutes to fix once you know where to look.
If you are building a new install from scratch, an oossxx security camera kit plus a junction box per camera is the cleanest path. Current pricing and our 10% code change, so check the latest OOSSXX price and grab the code before you buy. Done right, one afternoon of mounting work buys you years of clean, dry, tamper-resistant footage.
Frequently asked questions
Do I need a security camera junction box for my OOSSXX camera?
You can, but it is not recommended outdoors. Direct mounting leaves the Ethernet connector exposed to rain and gives water a direct path into the connection. A junction box hides and protects the splice and makes the install look cleaner.
How do I choose the right size junction box?
It depends on your camera's base pattern and the cable entry you need. A purpose-built CCTV box with a gasket, knockouts, and a matching camera foot is the easiest fit; generic electrical boxes require adapter plates.
How can I tell if my junction box is actually weatherproof?
Sight along the bottom edge of the box lid and the cable gland. Anything that would let rain or condensation in, such as an upward-facing knockout or a cracked gasket, needs resealing with exterior silicone.
Can I install a POE connection inside a junction box?
Yes. Use a weather-rated outdoor box, seal the cable entry with a gland or silicone, and add a drip loop on the incoming cable so water cannot track inside.
Why is my camera fogging up at night after mounting?
Most failures come from skipped gaskets, unsealed mounting screw holes, or an upward-facing cable entry. Pack every entry with sealant and keep the gasket flat and clean.
How long does a typical junction box install take?
About 20 to 30 minutes per camera for a first-timer, less with practice. Most of that time is fishing the cable and sealing the entries, not attaching the box itself.